How to Waterproof a Bathroom the Right Way
Bathroom waterproofing is one of the most important steps in any remodel. When done correctly, it protects your home from leaks, mold, mildew, and structural damage. When done incorrectly, even the most beautiful bathroom can quickly develop costly problems hidden behind walls and beneath tile.
At S-Line Contractors, we prioritize proper waterproofing because it ensures your remodel lasts for years — both in appearance and performance. Here’s how to waterproof a bathroom the right way, and why every detail matters.
1. Start With a Proper Assessment
Every bathroom is unique, and the waterproofing approach depends on:
- Existing moisture issues
- The condition of the subfloor
- Shower or tub design
- Ventilation quality
- Drain location
A thorough assessment ensures we identify hidden problems before installing new materials.
2. Remove Old Materials Down to a Solid Substrate
To waterproof properly, you must start clean. This means removing:
- Old tile
- Damaged drywall
- Failed waterproofing
- Moldy insulation
- Rotting wood
Working over compromised materials is one of the most common mistakes DIYers make — and it leads to repeated problems.
3. Use Moisture-Resistant Backer Board
Standard drywall should never be used behind tile in wet areas. Instead, professional contractors use:
- Cement board
- Fiber cement board
- Waterproof foam board
These materials provide a solid foundation that won’t break down from moisture exposure.
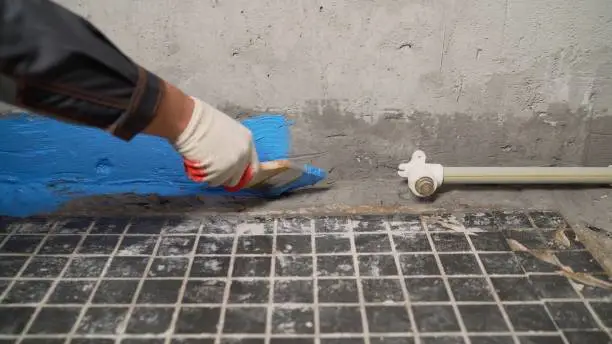
4. Apply a High-Quality Waterproof Membrane
This is the most important step. Waterproof membranes protect walls, floors, and shower pans from absorbing water. Options include:
Liquid Waterproofing Membranes
Applied like paint, these create a seamless barrier.
Sheet Membranes
Such as Schluter® Kerdi or similar products, which offer consistent waterproofing and easier inspection.
Professionals ensure all corners, seams, and screw holes are sealed completely.
5. Install a Proper Shower Pan System
A waterproof shower pan prevents water from leaking beneath the tile. High-quality options include:
- Pre-sloped foam shower bases
- PVC liner systems
- Hot mop systems (common in California)
A correctly sloped pan directs water into the drain rather than pooling underneath the tile.
6. Seal All Penetrations and Transitions
Weak points in waterproofing are usually found at:
- Pipe penetrations
- Niche interiors
- Floor-to-wall transitions
- Corners
- Valve openings
These areas must be reinforced with sealants, membrane patches, or waterproof gaskets.
7. Ensure Proper Floor Slope Toward the Drain
Even with good waterproofing, an improper slope can cause water buildup and mold growth.
Professionals ensure:
- A consistent slope
- Correct drain height
- No “bird baths” where water collects
A proper slope protects both the tile and subfloor.
8. Use Mold-Resistant Materials
To prevent long-term moisture issues, we use:
- Mold-resistant drywall (for non-wet areas)
- Anti-microbial caulks
- Moisture-resistant paints
- Properly sealed grout
These materials reduce maintenance needs and extend the life of your bathroom.
9. Improve Ventilation
Even a perfectly waterproofed bathroom can develop moisture problems without adequate airflow.
Best practices include:
- Installing a high-quality exhaust fan
- Ensuring proper venting to the exterior
- Using timers or humidity sensors
Ventilation is as important as waterproofing when it comes to preventing mold.
10. Conduct a Final Inspection Before Tiling
Before installing tile, professionals perform:
- Flood tests for shower pans
- Visual inspection of membranes
- Seam and corner checks
- Drain alignment inspection
Catching issues now avoids major problems later.
Final Thoughts
Waterproofing is one of the most critical steps in bathroom remodeling. It protects your investment, prevents leaks, and ensures your bathroom stays beautiful and functional for years.
At S-Line Contractors, we follow industry-leading methods to waterproof bathrooms correctly — with attention to detail, proper materials, and a commitment to long-term durability. Your bathroom should not only look amazing but also stand strong against moisture.
Frequently Asked Questions (FAQ)
Do I really need waterproofing behind tile?
Yes. Tile and grout are not waterproof. Without a proper membrane, moisture will penetrate and cause damage.
How long does bathroom waterproofing take?
Depending on the system, 1–3 days including prep, membrane drying time, and inspections.
What’s the best waterproofing system?
Both sheet and liquid membranes work well when installed correctly. The choice depends on the bathroom design and materials.
Can I waterproof a bathroom myself?
DIY waterproofing often leads to hidden leaks. It’s best handled by licensed professionals to ensure correct installation and code compliance.
How do I know if my bathroom has water damage?
Signs include soft floors, cracked grout, mold, mildew odors, or discoloration on walls/ceilings below the bathroom.
Let’s Build Something Together
Ready to elevate your commercial space? Contact S-Line Contractors today to discuss your project and discover how we can bring your vision to life.